Battery switch on travel trailer function is crucial for managing your RV’s power. Understanding how to use it correctly ensures you can enjoy your adventures without electrical headaches. This guide covers everything from the different types of switches and their wiring to troubleshooting common problems and essential safety tips. We’ll delve into how the switch interacts with your trailer’s charging system, preventing battery drain and maximizing your off-grid power.
Get ready to become a pro at managing your travel trailer’s power!
We’ll explore various battery switch types, their pros and cons, and step-by-step instructions for operation. We’ll also troubleshoot common issues, providing solutions and preventative maintenance advice. Finally, we’ll cover safe installation and best practices to keep your system running smoothly and safely.
Understanding Battery Switch Functionality in Travel Trailers
Your travel trailer’s battery switch is a crucial component, managing the flow of power between your trailer’s batteries and its electrical system. Understanding its function is key to preventing electrical issues and ensuring a smooth camping experience. This section will break down the different types of switches, their wiring, operation, and advantages/disadvantages.
Battery Switch Types
Travel trailers typically utilize one of two main types of battery switches: a simple on/off switch or a more sophisticated multi-position switch. Simple on/off switches are the most basic, offering only the ability to connect or disconnect the battery from the trailer’s electrical system. Multi-position switches, often with three or more positions, provide more control, allowing you to isolate batteries, connect them to shore power, or combine them for increased capacity.
Some more advanced switches even include features like battery monitoring capabilities.
So, you’re an audiophile who loves to travel? Awesome! Check out this guide on creating the perfect audiophile travel setup for your next adventure. It’s all about packing light but smart. Then, once you’ve mastered the basics, consider upgrading your portable listening experience with tips found on this other great resource for audiophile travel setups – it focuses on maximizing sound quality even on the go.
Remember, good sound doesn’t have to stay at home!
Typical Wiring Diagrams
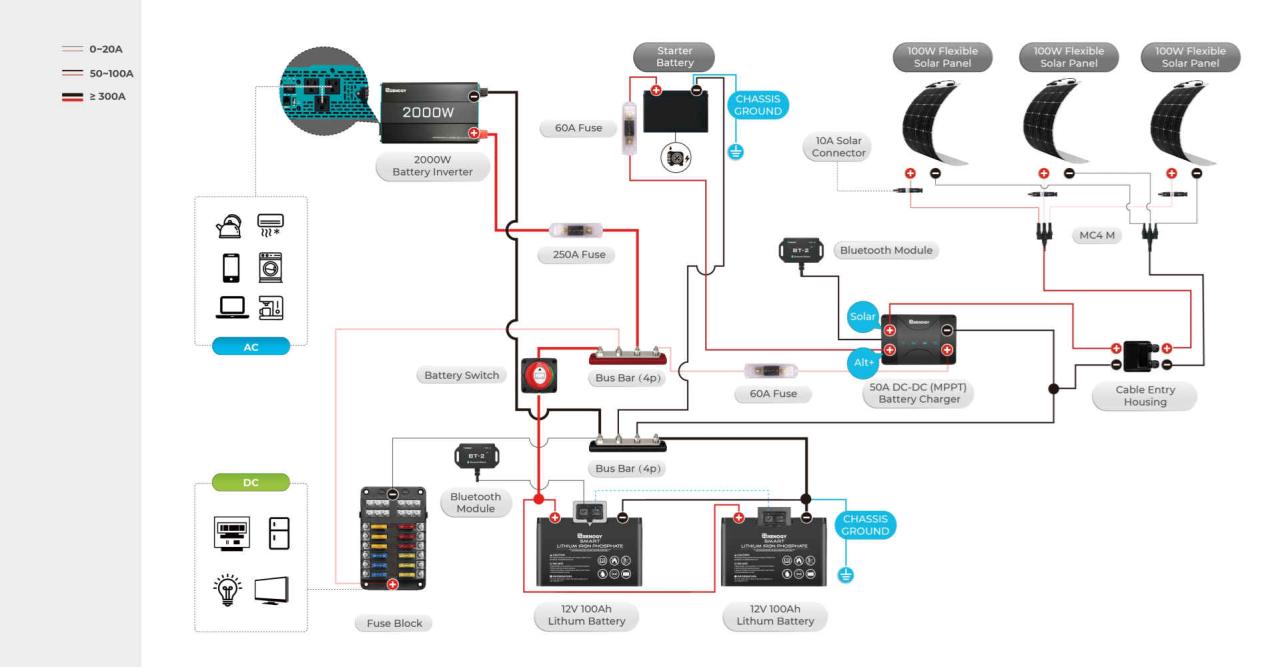
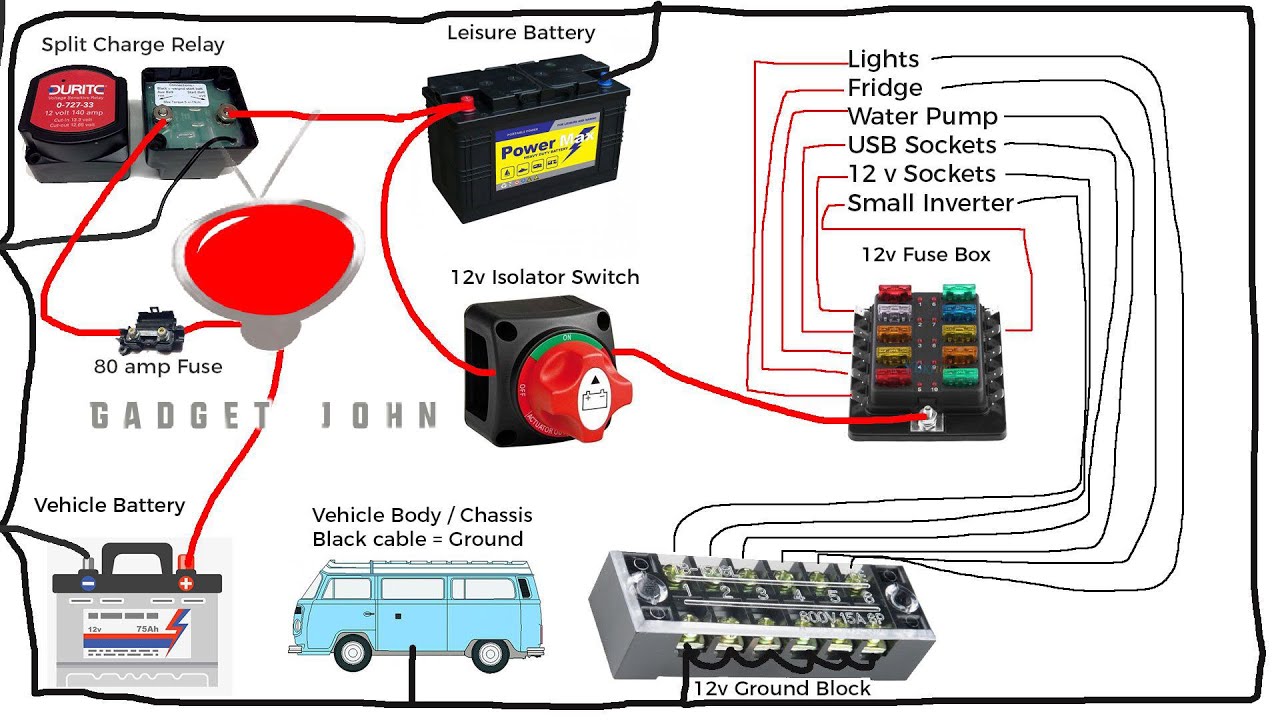
A basic on/off switch wiring diagram involves a single switch placed in the positive (+) wire running from the battery to the trailer’s electrical system. The negative (-) wire typically runs directly to the chassis and is grounded. Multi-position switches have more complex diagrams. A common three-position switch might have positions for: “Off” (completely disconnecting the battery), “Battery” (connecting only the battery to the trailer’s system), and “Battery & Shore” (connecting both the battery and shore power).
These diagrams typically show the positive wire routed through the switch, with separate pathways for the battery and shore power connections. Accurate diagrams are crucial for safe and correct installation; consulting a qualified electrician is always recommended for complex setups.
Operating a Battery Switch
Operating a battery switch is generally straightforward. For a simple on/off switch, the operation is self-. For a multi-position switch, carefully examine the switch’s markings to understand each position’s function. Always ensure the switch is in the “Off” position before performing any maintenance on the electrical system. When connecting to shore power, you might need to move the switch to a position that allows both battery and shore power to feed the trailer’s system.
Always follow the manufacturer’s instructions for your specific switch.
Advantages and Disadvantages of Battery Switch Types
Simple on/off switches are inexpensive and easy to install, but they lack the flexibility of multi-position switches. Multi-position switches offer greater control and protection but are more expensive and can be more complex to install. A key advantage of multi-position switches is the ability to isolate batteries for maintenance or prevent battery drain when not in use. The disadvantage lies in their increased complexity, potentially making troubleshooting more difficult.
Common Battery Switch Brands and Features
| Brand | Features |
|---|---|
| Blue Sea Systems | Multiple positions, high amperage ratings, robust construction, often include battery monitoring capabilities. |
| Perko | Various sizes and amperage ratings, durable design, suitable for various marine and RV applications. |
| AGS | Automatic switching capabilities, designed to prevent overcharging and maintain optimal battery health. |
Troubleshooting Common Battery Switch Issues
Your travel trailer’s battery switch is a crucial component, and when it malfunctions, it can leave you stranded without power. Understanding the common problems and how to troubleshoot them is key to maintaining your RV’s functionality. This section will guide you through identifying issues, determining their causes, and resolving them effectively.
Battery switch problems often manifest as a complete lack of power to the trailer, intermittent power outages, or an inability to switch between battery banks. These issues can stem from several sources, including corroded connections, faulty wiring, a damaged switch itself, or even a blown fuse. Proper diagnosis involves a systematic approach to eliminate possibilities.
Identifying Common Problems
Common problems include the switch failing to engage, making or breaking contact intermittently, or not switching power between batteries as expected. You might notice your house batteries not charging while the engine is running, or your appliances not working even when the switch is seemingly in the correct position. Sometimes, the switch may feel stiff or difficult to operate, indicating a potential internal problem.
Causes of Battery Switch Malfunction
Several factors can contribute to a malfunctioning battery switch. Corrosion on the terminals is a frequent culprit, preventing proper electrical contact. Loose or damaged wiring can interrupt the circuit. The switch itself may fail due to wear and tear, especially with frequent use or exposure to the elements. A blown fuse in the battery switch circuit will also prevent the switch from functioning correctly.
Finally, incorrect installation or improper use can lead to premature failure.
Troubleshooting Steps for a Non-functioning Battery Switch
Before attempting any repairs, always disconnect the negative terminal from your battery to prevent accidental shocks. Your troubleshooting process should begin with a visual inspection. Check for corrosion on the battery terminals and switch connections. Clean any corrosion with a wire brush and baking soda solution. Next, carefully inspect all wiring connected to the switch for damage or loose connections.
Tighten any loose connections. If you find any broken or damaged wires, replace them. Test the fuse in the battery switch circuit; replace it if blown. If the switch itself appears damaged or if you’ve ruled out other issues, it might be time to replace the switch.
Troubleshooting Flowchart
This flowchart visually guides you through the troubleshooting process:
Start –> Inspect battery terminals and switch connections for corrosion –> Clean corrosion (if present) –> Inspect wiring for damage or loose connections –> Tighten loose connections/Replace damaged wires –> Check fuse in battery switch circuit –> Replace fuse (if blown) –> Test switch functionality –> Switch works? (Yes – End, No – Replace battery switch) –> End
Common Replacement Parts
Having replacement parts readily available can significantly reduce downtime. Consider keeping these on hand:
- Battery switch (the same type as your current one)
- Fuses (matching the amperage of your circuit)
- Wire connectors
- Battery terminal cleaner
- Assorted gauge wire
Battery Switch and its Impact on Electrical Systems
Your travel trailer’s battery switch is more than just an on/off button; it’s a crucial component that manages power flow between your house batteries and the trailer’s electrical systems, as well as external charging sources. Understanding its function is key to preventing electrical problems and maximizing your RV’s lifespan.The battery switch acts as a gatekeeper, controlling the flow of electricity to and from your house batteries.
This interaction with the charging system is vital for preventing overcharging and ensuring proper power distribution. When the switch is in the “on” position, the batteries can both power the trailer’s appliances and receive a charge from the shore power or your vehicle’s alternator (if properly wired). When in the “off” position, it completely isolates the house batteries from the rest of the electrical system, preventing accidental drain.
So, you’re an audiophile who loves to travel? Awesome! Planning your next trip? Check out this guide on audiophile travel setups for tips on keeping your sound quality high even on the go. It’s all about packing smart and choosing the right portable gear. Then, once you’ve got your portable setup dialed in, consider how to integrate it into your adventure plans.
For instance, look into resources like audiophile travel setups for ideas on blending your love of music with your love of exploring new places. Happy travels!
Battery Switch Role in Preventing Battery Drain
The primary purpose of the battery switch, beyond managing power flow, is to prevent unwanted battery drain. When your trailer is stored for extended periods, switching the batteries to the “off” position prevents parasitic drain from devices that constantly draw a small amount of power, such as clocks or carbon monoxide detectors. This ensures your batteries remain charged and ready for your next adventure.
Leaving the switch in the “on” position, even with no external charging source, will gradually drain your batteries, potentially leaving you with a dead battery when you’re ready to use your trailer.
Consequences of Incorrect Battery Switch Use
Incorrect use of the battery switch can lead to several problems. Leaving the switch in the “on” position while not using the trailer will eventually lead to a completely discharged battery. This can cause permanent damage to the battery, requiring replacement. Conversely, accidentally switching the batteries “off” while using the trailer will abruptly cut power to all appliances, potentially causing data loss on electronics or malfunctioning of sensitive equipment.
Furthermore, improperly switching the batteries can also lead to short circuits if not done carefully, potentially damaging components in your trailer’s electrical system.
Power Draw of Appliances with Battery Switch Engaged
The power draw of different appliances significantly varies, directly impacting your battery life. A small LED light will draw far less power than an air conditioner. Using the battery switch efficiently means understanding which appliances to use and when. For example, you might prioritize using energy-efficient LED lighting over incandescent bulbs to conserve battery power.
| Appliance | Power Consumption (Watts) | Power Consumption (Amperes) |
|---|---|---|
| LED Light (small) | 5 | 0.04 |
| Incandescent Light (60W) | 60 | 0.5 |
| Refrigerator (12V DC) | 100 | 8.33 |
| Air Conditioner (120V AC) | 1500 | 12.5 |
| Water Pump (12V DC) | 30 | 2.5 |
Safety Precautions and Best Practices
Working with your travel trailer’s battery switch involves handling potentially hazardous electrical components. Understanding and following safety procedures is crucial to prevent injury and damage to your equipment. This section Artikels essential safety measures and best practices for ensuring safe and effective use of your battery switch.
Improper use of the battery switch can lead to several serious risks, including electric shock, battery explosions, and damage to your RV’s electrical system. These risks are amplified if you don’t disconnect the battery properly before working on any electrical components. Even seemingly minor mistakes can have significant consequences.
Battery Switch Disconnection and Reconnection Procedures
Safe disconnection and reconnection of your battery are fundamental steps to protect yourself and your equipment. Always follow these steps meticulously:
- Before working on the battery switch or any electrical components, always ensure the main power switch is turned OFF. This will cut off power to the entire system, preventing accidental shocks.
- Wear appropriate safety gear, including safety glasses and gloves. This will protect your eyes and hands from potential hazards like battery acid splashes or sharp edges.
- Use insulated tools to avoid accidental contact with live wires or terminals. Never use metal tools if you’re unsure about the power status of the system.
- Disconnect the negative (-) terminal first. This is a crucial safety step to prevent accidental short circuits. Use a wrench or socket appropriate for the terminal size.
- Reconnect the positive (+) terminal first, followed by the negative (-) terminal. This ensures a safe and controlled power flow.
- After completing your work, double-check all connections to ensure they are secure and properly tightened. Loose connections can lead to overheating and potential fires.
Potential Risks Associated with Improper Battery Switch Use
Ignoring safety precautions when working with your battery switch can result in several dangerous scenarios. These include:
- Electric Shock: Accidental contact with live wires or terminals can cause severe electric shock, potentially leading to serious injury or death.
- Battery Explosion: Improper handling of batteries, especially when charging or discharging, can lead to gas buildup and subsequent explosions. This can cause burns, injuries from flying debris, and damage to surrounding equipment.
- Electrical System Damage: Incorrect switch operation or faulty connections can damage your RV’s electrical system, leading to costly repairs or replacements.
- Fire Hazard: Sparks from loose or corroded connections can ignite flammable materials, leading to a fire. This is particularly risky in enclosed spaces like an RV.
Regular Battery Switch Maintenance and Cleaning
Regular maintenance extends the lifespan of your battery switch and minimizes the risk of malfunctions.
Regular inspection and cleaning of the battery switch connections are crucial to prevent corrosion and ensure optimal performance. Corrosion buildup can impede current flow, leading to overheating and potential failure. Here’s how to properly clean and inspect your battery switch connections:
- Inspection: Regularly inspect the connections for signs of corrosion, looseness, or damage. Look for any discoloration, white powdery substance, or loose wires.
- Cleaning: Disconnect the battery before cleaning. Use a wire brush or a specialized battery terminal cleaner to remove corrosion. Apply a corrosion inhibitor to protect the terminals from future corrosion. After cleaning, ensure all connections are secure and tightened appropriately.
- Tightening: Check that all bolts and nuts are securely tightened. Loose connections can cause overheating and potential fire hazards.
Selecting and Installing a Battery Switch: Battery Switch On Travel Trailer Function
Choosing and installing the right battery switch is crucial for safe and efficient power management in your travel trailer. The wrong switch can lead to electrical problems, potential damage to your appliances, or even fire hazards. This section will guide you through selecting the appropriate switch and performing a safe installation.
Battery Switch Selection
Selecting the correct battery switch involves considering the amperage rating of your battery bank and the number of batteries you have. The switch’s amperage rating must exceed the maximum current draw of your entire system. For instance, if your total battery bank draws a maximum of 100 amps, you’ll need a switch with a higher amperage rating, such as 150 amps or more, to provide a safety margin.
Consider also the type of switch: a simple on/off switch is sufficient for basic needs, while a more sophisticated switch with multiple positions (like a battery combiner switch) offers greater control and flexibility, allowing you to isolate batteries or combine them for charging or usage. Always choose a switch rated for the appropriate DC voltage (typically 12V for travel trailers).
Battery Switch Installation Procedure
Proper installation is key to a functioning and safe system. Begin by disconnecting both battery terminals completely before commencing any work. This is a crucial safety precaution to prevent accidental shocks or short circuits. Choose a location for the switch that’s easily accessible, well-ventilated, and protected from the elements. Securely mount the switch using appropriate hardware, ensuring it’s firmly attached and won’t vibrate loose during travel.
Run heavy-gauge wiring (at least 4 AWG for systems drawing significant current) from the battery terminals to the switch, and from the switch to your trailer’s electrical system. Use appropriately sized ring terminals to create secure connections at each point. Always use wire nuts or crimp connectors for wire splices, and seal them with electrical tape to prevent corrosion and short circuits.
Grounding Importance
Proper grounding is paramount for safety and preventing electrical issues. The negative (-) terminal of your battery bank should be connected to a solid, clean ground point on your trailer’s chassis. This ground point should be free of paint or corrosion to ensure a good electrical connection. The ground wire from the battery should be as thick as, or thicker than, your positive (+) wires.
Connecting the ground wire to the chassis before connecting the positive wire to the switch will help prevent accidental short circuits.
Installation Method Comparison, Battery switch on travel trailer function
Several methods exist for installing a battery switch. The most common involves a direct connection between the battery bank and the switch, with the switch then connecting to the trailer’s electrical system. Another method uses a bus bar to consolidate multiple connections, improving organization and reducing the number of individual wire connections. Choosing a method depends on your system’s complexity and personal preference.
A bus bar approach is generally recommended for larger, more complex systems with multiple batteries or high current demands for better organization and easier troubleshooting.
Correctly Installed Battery Switch System
Imagine a diagram showing a battery bank (two 12V batteries connected in parallel), connected to a 150-amp battery switch with clearly labeled positive (+) and negative (-) terminals. Heavy gauge wiring (4 AWG) runs from each battery terminal to the corresponding terminals on the switch. The positive (+) output of the switch is connected via 4 AWG wire to the positive bus bar of the trailer’s electrical system.
The negative (-) terminal of the battery bank is directly connected to a clean, unpainted ground point on the trailer chassis with a similarly sized ground wire. The negative terminal of the switch is also connected to the same chassis ground point, completing the ground circuit. The diagram includes labels for all components: Battery 1, Battery 2, Positive (+) Battery Cable, Negative (-) Battery Cable, 150 Amp Battery Switch, Positive (+) Output Cable, Negative (-) Ground Cable, Trailer Chassis Ground Point, and Positive (+) Bus Bar.
All connections are clearly shown using solid lines to represent the wiring, and the system is presented in a clean and organized manner to easily understand the flow of electricity.
Mastering your travel trailer’s battery switch is key to a worry-free RV experience. By understanding its function, troubleshooting potential issues, and following safety guidelines, you’ll be confident in managing your power supply, whether you’re boondocking or connected to shore power. Remember regular maintenance and safe practices are paramount to prolonging the life of your battery system and preventing costly repairs.
So, get out there and enjoy the open road with peace of mind!
FAQ Corner
What happens if I leave my battery switch in the “off” position?
Leaving the switch off completely disconnects your house batteries from the rest of the electrical system, preventing any power drain, even from parasitic loads. However, it also means no power to your appliances or lights.
How often should I clean my battery switch terminals?
Clean your battery switch terminals at least once a year, or more frequently if you notice corrosion or poor connections. This prevents voltage drop and ensures optimal performance.
Can I use any type of battery switch in my travel trailer?
No, the appropriate battery switch depends on your trailer’s electrical system and battery bank size. Consult your trailer’s manual or a qualified RV technician for guidance.
What size fuse should I use with my battery switch?
The correct fuse size depends on the amperage rating of your battery switch and wiring. Always use a fuse with an amperage rating equal to or slightly higher than the switch’s rating. Consult your switch’s documentation for the correct fuse size.
